NOTE: Instructions given here are for the inch version of the boring head. The metric boring head is used in the same manner, although the adjustment dial is marked in increments of .02mm instead of .01". Rather than try to make one set of instructions work for both using double numbers, we have created a separate set for the metric version which is supplied when that product is purchased.
Boring holes on a mill is very similar to boring holes on a lathe except the cutting tool moves rather than the part. The main advantage of boring over drilling is that the hole will always come out in perfect alignment with the spindle whereas a drill may "wander". Larger holes must be bored rather than drilled on a small mill because large drills cannot be chucked in a Sherline and it takes horsepower to drill holes over 3/8" (10mm).

FIGURE 1--Parts of the Boring Head. A) 10-32 Cap Screw--Tighten enough to hold in place while boring but loose enough to move bottom slide with 4-40 screw dial. B) 4-40 Screw Dial--Tighten to increase diameter. To reduce diameter, loosen 10-32 and 4-40 screws and slide back. C) Index Bottom slide 180° for boring small diameter holes. (See also Figure 2.)
Tools put in the Sherline boring head should be as short as possible to keep set ups as rigid as possible. It is easier to bore a hole completely through a part than to cut into a flat bottom hole. The problem is tool chatter when you get to the bottom. A hole has to be started with a drill to the full depth of the finished hole. Many times the work will require a special boring tool that usually can be made from a standard boring tool.
Boring tools that are commercially available with a 3/8" shank have a shank that is too long for our boring head. To insure a rigid set up, cut part of the shank off. The shank of the tool should not extend much below the boring head. Sherline boring tools are ready to use without this cutoff operation.
Boring holes over an inch deep can get difficult because it takes long tools which compromises rigidity. If you need a large flat bottom hole, consider doing it on a rotary table with an end mill. If you have to have a flat bottom hole, a good tip is to turn the spindle off .002" (.05mm) from the bottom and rotate the spindle by hand while feeding the spindle down the remaining distance to eliminate chatter at the bottom. A wrench on the boring head drawbolt can make it easy to rotate while cutting.
If you have an existing hole's location out of tolerance, many times you can use a boring tool to correct the location. A boring tool follows the spindle, not the hole. A bushing can be made to press into the bored hole to correct the diameter that has been bored oversize. This method can also be used to correct shaft holes that have worn elliptically in space plates.
Remember the rule: "If a tool chatters, reduce speed (RPM), Increase Feed (Rate handwheel is turned) and take lighter cuts (Boring head adjustment)."
Drill a hole as large as you can and still leave at least .060" (1.5mm) to finish bore. Decide the configuration of the boring head. The hole that accepts the boring tool can be indexed for large or small diameter holes. Use the combination that will keep maximum engagement of the boring head's dovetail.

FIGURE 2—Reversing lower portion of boring head for large or small holes.
Clamp the boring tool into the boring head so the cutting face of the tool is in alignment with the center of the spindle.
Adjust the tool in or out to take approximately .020" (.5mm) cut in aluminum.

FIGURE 3--Fine adjustments of the Boring Head. One turn of the 4-40 screw dial will produce an increase of .050" in the bored diameter. Each increment on the dial is 7°, which produces a rotation of the screw equivalent to .001" in the bored diameter. Major increments are marked on the dial at 10 (.010"), 20 (.020"), 30 (.030") and 40 (.040").
Note: Do not attempt to bore any metal other than aluminum or brass until you have the skill to hold exact diameters on these easier to machine materials.
Be sure the boring head screws are tightened properly and turn on spindle at approximately 1/4 speed. Take a cut by feeding the tool into the part at a rate that keeps a continuous chip. Feeding too slow can cause chatter. A small amount of cutting oil will dramatically help the process. Repeat this process until the hole is "roughed" out. Leave about .030" (.7mm) for finishing.
Before going to the finish diameter, determine that you can get a suitable finish with the tool you're using. Take a light cut and stop the spindle at the bottom and inspect the finish. Start the spindle and back the tool out. Usually the tool will take a light cut on the way out. Stop the spindle and inspect the finish. What you should learn from this exercise is where to stop your cut for the best possible finish, in or out?
If your tool needs sharpening, sharpen it before you get near the finish diameter. You can't bore a hole any more accurately than you can measure it. Learn how to use small hole gauges and telescoping gauges. If you only have dial calipers, bore the hole and, if possible, turn the mating part on a lathe to fit the hole if a good fit is required (lathes are easier to hold tight tolerance diameters on).
From this point on it's best to "sneak up" on the finish diameter by taking half the cut required to get to the finish diameter. Cuts will keep getting smaller, and when you get to an error so small it would be hard to adjust the boring head .001" (.02 mm), try feeding the tool in at a higher RPM to bring the diameter to size.
Only the basics are written in these instructions and to make these basics work, it requires a liberal amount of common sense. If you have any doubts about a set up, it isn't good enough! The skill of machining is making accurate parts first try. If this is your first attempt to use a boring head, bore a hole .575" or 16mm through a piece of aluminum approximately 3/8" (10mm) thick and see if you can come within .0005" (.025mm) first try. This will be a good test of your machining skills!
Joe Martin, President and Owner
SHERLINE Products
|
NO. REQ. |
PART NO. |
DESCRIPTION |
|
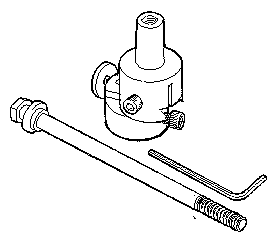
1 |
3088 |
1/4-20 x 5-1/8" Drawbolt and Washer |
|
1 |
3107 |
Gear Drive Pin |
|
1 |
3156 |
4-40 x 7/8" Skt Hd Cap Screw |
|
1 |
3157 |
Adjustment Dial |
|
1 |
3158 |
Boring Head, Primary (top) |
|
1 |
3159 |
Boring Head, Secondary (bottom) |
|
1 |
4034 |
10-32 x 1" Skt Hd Cap Screw |
|
1 |
4057 |
3/32" Hex Key |
|
1 |
4069 |
10-32 xx 3/4" Skt Hd Cap Screw |
RETURN TO ACCESSORIES MASTER LIST
Shop for Sherline LATHES
Shop for Sherline MILLING MACHINES
RETURN TO My Home Page
| Home
Page | Frequently
Asked Questions | Testimonials
| Lathes
|
| Mills
| Accessories
|
Tool
Prices | Accessory
Prices |