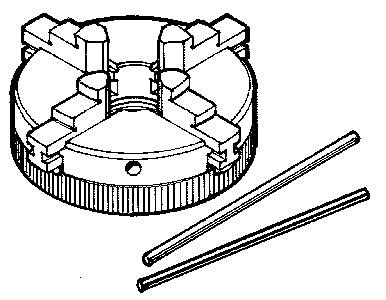


Self centering chucks are designed to have all the jaws move in unison. The jaws are driven by a spiral scroll when the knurled ring is turned. Self centering chucks will never duplicate the accuracy that can be attained with jaws that are moved independently, but they will usually "get the job done", saving a machinist much time and effort.
The main purpose of a 4-Jaw Self Centering Chuck is to hold square stock. It can also be useful in holding thin wall round tubing that will collapse easily. Round stock that is held in this chuck must be perfectly round and can not be at all elliptical or one of the jaws will not grip. The same is true for square stock; it must be very square and not at all rectangular to achieve a proper grip with all four jaws.
This chuck is designed s that the jaws can be removed and reversed to hold larger stock. In the normal position, stock from 3/32" (2.0mm) to 1-3/16" (30.16mm) can be secured. With the jaws reversed, material up to 2-1/4" (56.0mm) can be held. The hole through the center of the chuck is .687" (17.46mm).
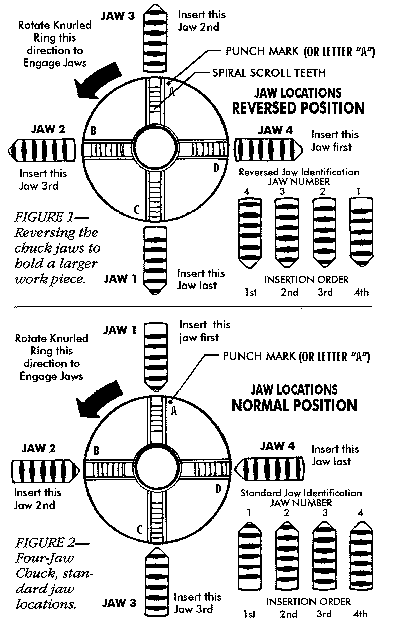
When seen from the front, turning the scroll clockwise backs the jaws out. Turn clockwise until all jaws can be removed. The jaws can be identified by the location of the teeth as noted in Figures 1 and 2 above.
When reversing the jaws, jaws 4 and 2 will go back into the same slots from which they were removed. Jaws 3 and 1 will swap positions. The order of installation to reverse the jaws is 4-3-2-1. (See Fig. 1.)
To install the jaws in the reversed position, turn the scroll counterclockwise (when viewed from the top) until the outside tip of the spiral scroll thread is just ready to pass the slot for the first jaw to be inserted (jaw #4). Slide jaw 4 as far as possible into the slot. Turn the scroll until the jaw is engaged.
Due to close tolerances between the slot and jaw, the most difficult part of replacing the jaws is engaging the scroll thread and first tooth of each jaw without binding. Never use force when replacing the jaws, and if binding occurs, simply back up the scroll slightly and wiggle the jaw until it is free to move in the slot. Advance the scroll counterclockwise and engage jaw #3 next in the slot that previously held jaw #1 (the slot marked with a punch). continue to engage jaws 2 and finally 1.
When reinstalling jaws in normal position, the order of insertion reverts to 1-2-3-4. (See Fig. 2.)
A set of replacement jaws is available as P/N 1177. Should repair become necessary, please return your chuck to the factory so that we may replace the jaws and check the alignment of the chuck before returning it to you. In the case of a damaged chuck body, replacement of the entire chuck is usually more economical than attempting repairs.
Joe Martin, President and Owner
SHERLINE Products
RETURN TO ACCESSORIES MASTER LIST
Shop for Sherline LATHES
Shop for Sherline MILLING MACHINES
RETURN TO My Home Page
| Home
Page | Frequently
Asked Questions | Testimonials
| Lathes
|
| Mills
| Accessories
|
Tool
Prices | Accessory
Prices |