Back to my Clock, Watch and Lathe Courses
CAUTION!Read all operating instructions carefully |
NOTE: See general machine setup section for lubrication and general machining instructions.
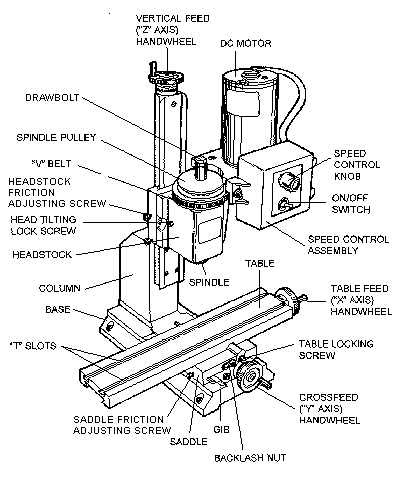
FIGURE 1-Milling Machine part terminology
At first glance, a vertical mill looks similar to a drill press, but there are some important design differences; for example, a spindle that can take side loads as well as end loads and an accurate method of moving work in relation to the spindle on all three axes. It is wise to memorize these "X", "Y" and "Z" axes, because since the advent of complex electronically controlled milling machines, these terms have become common "shop talk", even outside engineering departments. (See Figure 2.) Feed screws with calibrated handwheels control movements on these three axes. The handwheel calibrations are quite accurate and should be used whenever possible.
Angles can be machined by removing the headstock alignment key and rotating the milling head to the appropriate angle to the work or by holding the work at an angle to the spindle. (Note: Lighter than normal cuts should be taken when the alignment key is not in place.) The latter method must be used for drilling to keep the drill movement parallel with the machine slide. All machine slides have an adjustable gib to compensate for any "play" that may develop. (See section on adjusting gibs in the "Adjustments" section of the setup instructions.)
In August, 1998, Sherline introduced the Model 2000 mill and related upgrades that allows for eight directions of adjustment. For instructions specific to this machine, click here.
It is assumed that anyone purchasing a vertical milling machine has had some experience working with metal cutting tools; therefore, these instructions are somewhat limited for a beginner. There is enough information, however, to enable a good craftsman to get started. Using a vertical mill correctly takes more skill and experience than is required for lathe operation because of the additional axis (vertical) and the more varied type of work which can be performed.
The machine must be well maintained, for it is subject to higher stresses than a lathe. This particular mill is one of the smallest being manufactured and is an extremely useful tool. However, it would be unreasonable to clamp a 3-pound piece of stainless steel to the work table and expect to make a 1-pound part from it. The key point is to work within the capabilities of the machine, and those limitations can only be determined by the operator.
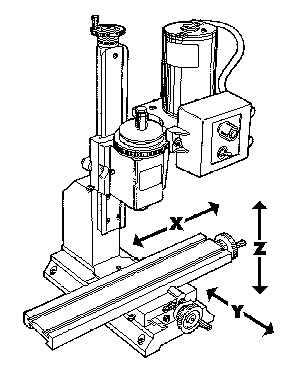
FIGURE 2-- The three axes of movement on a vertical milling machine.
The first problem encountered will be holding the work and aligning it to the machine. It is important for reasons of safety and accuracy that the workpiece be solidly secured. This may be the most difficult task, since once the work is clamped in position, the method of doing the entire job has been established.Usually, a rectangular block can be easily held in a vise. Note that round stock may also be held in a "V" shaped vise slot. Mill vises are specially designed to pull the movable jaw down as they tighten on it.
Certain objects can be secured with a 4-jaw lathe chuck, which is in turn clamped to the machine. Some irregular shapes, such as steam engine castings, may present greater difficulties. Often they may be clamped directly to the table. Very small or irregular shapes can be secured by epoxying them to a second, more easily held piece of material. The part is then broken loose from the material after machining.
The following steps should be considered before commencing any part:
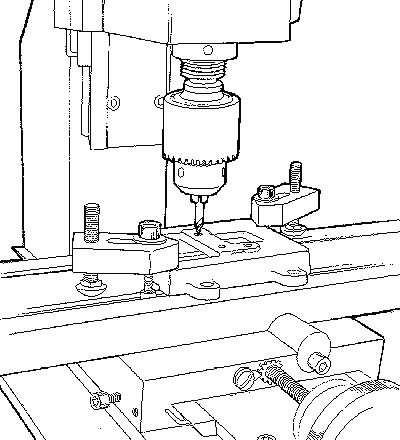
Figure 3-Center drilling a part clamped to the table with the hold-down set.
In summary, you should become aware of the fact that milling is difficult, but not impossible. There are many more considerations than just moving the handwheels, and you should not start your first step until your last step has been determined.
There are three basic types of work which can be performed with a vertical milling machine: milling, drilling and boring. It would be extremely difficult to determine whether a vertical mill or a lathe would be the most valuable machine in a shop. Theoretically, most vertical mills are capable of reproducing themselves with standard milling accessories such as a rotary table and centers. This would be impossible on a lathe without exotic modifications and attachments. These instructions briefly describe standard vertical mill work. Many comprehensive books are available on this subject, and, although the machines they describe are much larger, the principles remain the same. A good starting point is Doug Birney's book, The Home Machinist's Handbook. It is available through SHERLINE as P/N 5300 and uses SHERLINE tools throughout in all the setups and examples.
Milling on a vertical mill is usually accomplished with end mills. These cutters are designed to cut with both their side and end. (See Figure 12.) Drilling is accomplished by raising and lowering the entire milling head with the "Z" axis feed screw. Center drills must be used before drilling to achieve any degree of accuracy. (See Figure 18.) Note that subsequent holes may be accurately "dialed in" from the first hole by using the calibrated handwheels. Each revolution of the wheel will yield .050" of travel or 1mm for the metric machines. There is no need to start with the handwheel at "zero", although this can be easily accomplished with the optional "zero" resettable handwheels to make calculations easier.
Boring is a method of making accurate holes by rotating a tool with a single cutting edge, usually in an adjustable holder called a boring head. It is used to open up drilled holes or tubing to a desired diameter. (See Figure 4.)
Another type of milling is performed with an adjustable flycutter, which may be used for surfacing. For maximum safety and rigidity, the cutting bit should project from the holder no further than necessary. A 1-1/2" diameter circle of cut is quite efficient, and multiple passes over a surface should overlap about 1/3 of the circle size. For machining aluminum, use a speed of 2000 RPM and remove about .010" (0.25mm) per pass. (See also the flycutter information in the Tools & Accessories Catalog.)
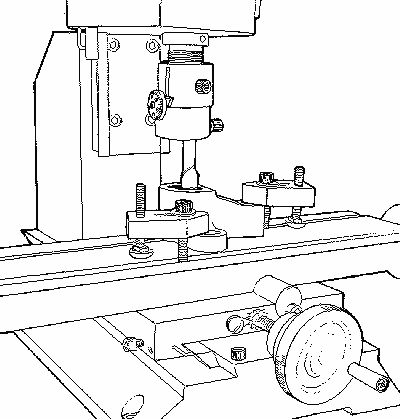
FIGURE 4- Boring the inside of a hole to exact size with a boring tool held in a boring head.
It is important to understand that the cutting action of a milling cutter varies depending upon the direction of feed. Study the relationship of cutting edges to the material being cut as shown in Figure 41. Note that in one case the tool will tend to climb onto the work, whereas in the other case the tool will tend to move away from the cut. The result is that climb milling should be avoided except for very light finishing cuts.
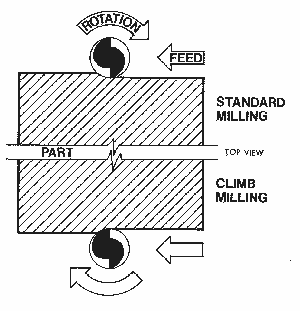
FIGURE 5-Standard vs. climb milling. (For clarity, consider the cutter moving rather than the part.)
A common practice when working with a mill is to lay out the hole centers and other key locations using a height gauge and a surface plate. A coloring (usually deep blue) called layout fluid is brushed or sprayed on a clean surface of the part. A thin layer is best because it dries quicker and won't chip when a line is scribed. The purpose of this fluid is to highlight the scribed line.
Don't prick punch the scribed crossed lines representing a hole center. Using a center drill in the mill spindle and a magnifying glass, bring the headstock down until the center drill just barely touches the scribed cross. Examine the mark left with a magnifying glass and make any corrections needed to get it perfectly on center. You should be able to locate the spindle within .002" (.05mm) of the center using this method.
Once the first hole is located in this manner, the additional holes can be located using the handwheels. (This is where the optional resettable "zero" handwheels are handy.) Now the scribe marks are used as a double check and the handwheels take care of the accuracy. Don't forget the rules of backlash and always turn the handwheels in the same direction as you go from one point to the next.
The basis of most accurate machining involves the use of a universal dial test indicator; a small, inexpensive indicator which is calibrated in .001" or .01mm divisions. An indicator with a large face or one that reads in finer divisions is not necessary for use with this mill. Three major tasks that can be accomplished with an indicator are:
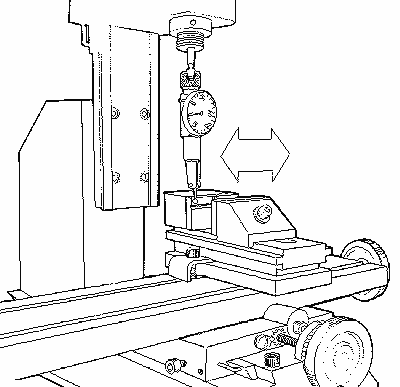
FIGURE 6-Indicating in the jaws of a vise. Shown is a Starret "Last Word" Indicator. Starret gauges are available in numerous sizes and types. They are manufactured in Athol, Massachusetts and can be purchased from most industrial dealers.
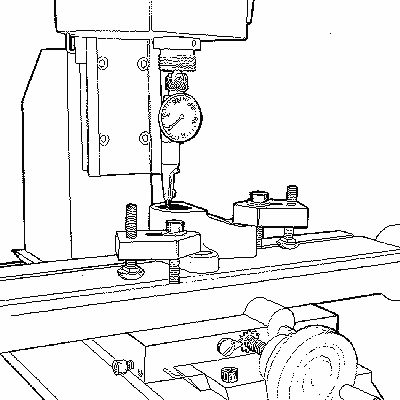
FIGURE 7-Indicating in the center of a hole.
A vise can be mounted or a part can be clamped down exactly parallel with the machine slides by holding the test indicator stationary and moving the slide with which you wish to align. When "indicating in" a vise, always take the reading on the fixed jaw. To start with, use approximately .005" indicator deflection from neutral. Remember that excessive pressure can cause inaccurate readings. Also, try to keep the indicator finger at a reasonable angle to the indicated part or surface. When the part is properly aligned there will not be any deflection on the indicator. If you wish to locate the spindle over an existing hole, place the indicator in the spindle and read the inside surface. Move the "X" and "Y" axes until there is no deflection when the spindle is rotated. At this point, the spindle is in perfect alignment with the hole's center.
When aligning the spindle to used bearing holes, remember that the hole may be worn out-of-round, and it may be impossible to attain zero indicator deflection reading. Boring out a worn bearing hole to a larger diameter and sleeving it with a simple bushing made on a lathe is a fairly common machining operation. With the new bushing pressed in, the bearing will be like new.
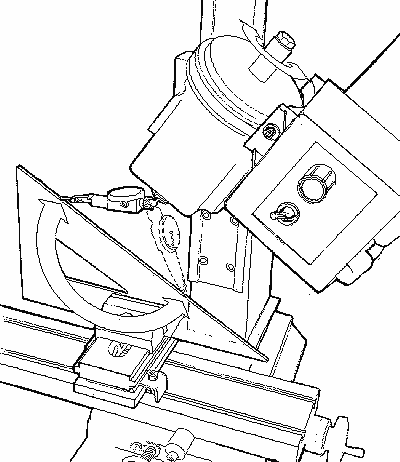
FIGURE 8--Indicating in a head tilt using a mill vise and draftsman's triangle.
The squareness of your machine may also be checked with an indicator. For instance, alignment of the head can be checked by offsetting the indicator in the spindle so the tip will move on a 5-inch diameter circle. The amount of reading relative to the table is the amount of error. Don't be discouraged to find a few thousandths of an inch error in your machine. This machine has been designed to have the most accuracy commensurate with reasonable cost. In machine tool manufacturing, accuracy and cost run hand in hand. To increase accuracy only a few percentage points could double the selling price, because entirely different manufacturing processes would be required. However, you can personally improve the accuracy of your machine with a few shims if needed by employing your dial indicator.
The column bed is aligned with the column block at the factory. If you remove it, it will have to be realigned by mounting a known "square" on the mill table and adjusting placement of the bed by running an indicator on the square as the headstock is raised and lowered. The same method can be used to check alignment of the column bed to ensure it is square with the "Y" axis. To correct any error (which should be small), place a shim between the column block and the mill base.
There are two quick methods of "picking up an edge" of a part on a mill. The first is to put a shaft of known diameter in the spindle and see that it runs perfectly true. Using a depth micrometer against the edge of the part, measure the distance to the outside diameter of the shaft. To that dimension add 1/2 the known shaft diameter. You now have the distance from the edge of the part to the centerline of the spindle. Rotate the handwheel on the axis being set exactly this distance and you will have the centerline of the spindle lined up with the edge of the part from which you measured.
The second method is much easier. It involves the use of a clever tool called an "edge finder". These devices have been around for years and have two lapped surfaces held together by a spring. One surface is on the end of a shaft which fits in a 3/8" end mill holder and is held in the spindle. The other is a .200" diameter shaft held to the larger shaft with a spring so it is free to slide around. With the spindle running at approximately 2000 RPM the shorter shaft will be running way off center. As this shaft is brought into contact with the edge you are trying to locate in relation to the spindle, the .200" shaft will be tapped to the center as the spindle rotates. This keeps making the .200" shaft run continually truer. When the shaft runs perfectly true it makes contact with the part 100% of the time. This creates a drag on the surface of the shaft that will "kick" it off center. (See Figure 9.) At this point you know the part is exactly .100" (half the diameter) from the centerline of the spindle. Advancing the handwheel on a SHERLINE mill two revolutions (.050" per revolution) will bring the edge of the part into alignment with the spindle.
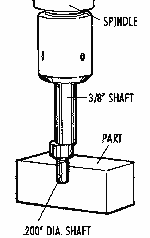
FIGURE 9--Using an "edge finder" to accurately locate the edge of a part.
It is important to use a high quality edge finder such as the Starrett 827A shown in the drawing. It must have a 3/8" shaft to fit the end mill holder on the Sherline mill. Metric sized edge finders are also available which work in the same manner.
There are no firm rules other than common sense for determining depth of cut. A .030" cut depth with a 3/16" end mill in aluminum could be considered light, but .003" cut depth in steel with a 1/32" diameter end mill would break to cutter. Start with very light cuts and gradually increase the depth until satisfactory results are achieved. Try to develop the skill of knowing how much cut is satisfactory without breaking the cutter or damaging the work.
Note that regular end mills should not be used for drilling; however, they may be employed to enlarge an existing hole. The cutting edges deserve more respect than those of drills even though similar in appearance; they are designed to cut with the sides.
It should be remembered that a good machinist is capable of making a part to much closer tolerances than those of the machine with which he is working. The accuracy of the parts you make is limited only by your skill as a craftsman and the quality of your measurement equipment. Accuracy should be the ultimate goal of every machinist!
SPINDLE RPM = (3.82 x S.F.M. ) ÷ D
S.F.M. = The rated Surface Feet for Milling. For drilling, use 60% of the rated surface feet.
RPM = The rated spindle speed in Revolutions Per Minute
D = The diameter of work in inches
FIGURE 10-Formula for adjusting spindle speed for cutting a given diameter.
NOTE: To estimate RPM, remember that the speed range of your vertical mill is from 0 to 2800 RPM. (The lowest usable speed is about 70 RPM, so we use that in our specifications. To obtain much more torque at the lower speed ranges, the drive belt can be switched to the smaller diameter positions on the spindle and drive pulleys.) Therefore, in the normal belt position, half speed is approximately 1450 RPM and so on. You can estimate these speeds by a combination of the setting on the speed control knob and the sound of the motor itself.
|
MATERIAL |
CUT SPEED |
1/8" |
1/4" |
3/8" |
|
Stainless Steel, 303 |
40 |
1200 RPM |
600 RPM |
400 RPM |
|
Stainless Steel, 304 |
36 |
1100 |
500 |
350 |
|
Stainless Steel, 316 |
30 |
900 |
450 |
300 |
|
Steel, 12L14 |
67 |
2000 |
1000 |
650 |
|
Steel, 1018 |
34 |
1000 |
500 |
350 |
|
Steel, 4130 |
27 |
800 |
400 |
250 |
|
Gray Cast Iron |
34 |
1000 |
500 |
350 |
|
Aluminum, 7075 |
300 |
2800 |
2500 |
2000 |
|
Aluminum, 6061 |
280 |
2800 |
2500 |
2000 |
|
Aluminum, 2024 |
200 |
2800 |
2500 |
2000 |
|
Aluminum, Cast |
134 |
2800 |
2000 |
1300 |
|
Brass |
400 |
2800 |
2800 |
2800 |
|
MATERIAL |
CUT SPEED |
1/16" DIA. |
1/4" DIA. |
|
Carbon Steel |
36 |
2000 RPM |
550 RPM |
|
Cast Iron, Soft |
30 |
1800 |
450 |
|
Stainless Steel |
24 |
1400 |
360 |
|
Copper |
72 |
2000 |
1100 |
|
Aluminum, Bar |
240 |
2000 |
2000 |
|
Aluminum, Cast |
120 |
2000 |
2000 |
FIGURE 11-End mill and drill speed adjustment chart.
End mills are the standard vertical mill cutting tools. We recommend 3/8" shank end mills held in the 3/8" end mill holder P/N 3079. One of the benefits of 3/8" end mills is they are available in a large range of sizes. The end mill is held with a set screw on its flat surface and it can be easily changed. They are also lower in price than miniature cutters because of their popularity. You can also use miniature series end mills having 3/16" or 1/4" shank sizes which should be held in collets. (End mills held in collets must be single ended, while end mills held in our end mill holders may be double ended.) We recommend using 2-flute, high-speed steel end mills for aluminum because the flutes are less prone to clog with chips. Use 4-flute cutters for cutting steels with lower RPM. The solid carbide tools are not suggested since they are very expensive and the cutting edges will chip unless used with heavy duty production equipment.

FIGURE 12-A typical end mill
As a convenience to our customers, SHERLINE keeps in inventory many of the popular sizes of end mills which are appropriate for use on our machines. See tooling price list for selection. End mills may also be purchased from your local industrial machine shop supply outlet (see yellow pages under "Machine Shop Supplies") or from mail order industrial suppliers.
Because small diameter cutters (less than 1/8") are quite fragile, the largest diameter cutter possible for the job requirements should be employed. Be certain that the RPM is appropriate before attempting to remove any metal. An end mill can be instantly damaged if a cut is attempted at excessive RPM. Like all cutting tools, end mills will have a short lifespan when used for machining steel or other exotic materials. Save new cutters for finish work. Do not use small diameter end mills with long flutes unless absolutely necessary because of excessive cutter deflection (bending).
End mills can be resharpened by your local tool and cutter grinding shop. End mills lose their cutting edge clearance after a couple of sharpenings and should no longer be reused.
FIGURE 13-3/8" End Mill Holder
The 3/8" end mill holder makes it easy to use the popular (and less expensive) 3/8" end mills. Using double ended end mills is economical and easy with this holder as tools are changed by simply loosening a set screw and changing the tool. The holder is now also available to hold smaller size tools in the same manner. The 3/16" end mill holder is P/N 6080 and the 1/4" end mill holder is P/N 6079.
FIGURE 14-3/8" End Mill Holder
The main purpose of the mill collet set is to hold end mills. The spindle nose has an internal Morse No. 1 taper, which closes the collet as the drawbolt is tightened. Morse tapers are approximately 5/8" per foot and are self-locking. Therefore, to loosen a collet, the drawbolt must be loosened a few turns and given a few light taps with a hammer.
The main purpose of the boring head is to eliminate the need for a large inventory of drills and reamers. A small milling machine would not have the power or rigidity to turn a one-inch diameter drill even if one could be obtained that would fit. However, holes of even larger diameters can be accurately bored to size with a little patience and care.

FIGURE 15-Boring Head and Boring Tool. P/N 3061 is for 1/4" (6.4mm) min. diameter by .60" (15.2mm) max. depth hole. P/N 3063 is for 5/16" (7.0mm) min. dia. by 1.0"(25mm) max. depth hole. Both have a 3/8" diameter shaft.
Boring heads work on the same cutting principle as lathe boring, except that the cutting tool turns while the work remains stationary. (In the case of a lathe, the work turns and the cutter remains stationary.) The boring head is designed to employ cutting tools with a 3/8" shank. SHERLINE offers two boring tools with lengths appropriate for the SHERLINE mill. It is sometimes advisable to remove excessive tool shank length from standard (non-SHERLINE) 3/8" boring tools in order to improve rigidity. (See Figure 4 for a boring tool in use.)
Tool sizes are listed indicating the smallest diameter hole that can be bored and the maximum depth that can be cut. For best results, use the largest diameter possible with the shortest lengths. A .010" cut represents a good starting point.
If boring a hole where a flat bottom is required, it is advisable to stop the down feed at about .002" above the desired depth, turn off the motor and cut the remaining distance by hand turning the spindle to eliminate any possibility of chatter.
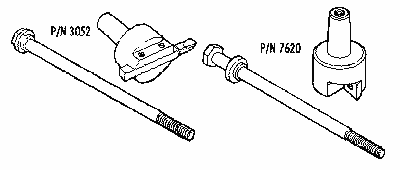
FIGURE 16-Standard flycutter (left) and inserted tip flycutter (rigit) with their drawbolts.
For machining flat surfaces, the flycutter shown in the SHERLINE Tool & Accessory Catalog is recommended. It is imperative that the tool be used with utmost care. EYE PROTECTION IS A MUST, and the work as well as the cutting tool must be properly held. The big advantage of a flycutter is its ability to take light cuts up to 2" wide and to give an excellent surface finish. It is ideal for squaring up work. Also, the machining stresses are lower than one might imagine, because very little crushing action takes place at the cutting edge, unlike an end mill. Flycutting tools look like left-hand lathe tools, and although the fly cutter (P/N 3052) comes with a brazed carbide tool, high speed tools work quite well and can be sharpened on any grinder.

FIGURE 17-A typical setup for flycutting.
For those who prefer the advantages of working with inserted carbide tip tools, the P/N 7620 flycutter is available. It uses replaceable carbide cutting inserts which last longer than steel tools without sharpening, plus they provide an excellent finish on hard to machine materials like cold rolled and stainless steels. The cutter shape allows it to cut a straight shoulder on a part, something not possible with a standard flycutter. Included is the toolholder, a drawbolt, a 2-edged carbide insert and Torx T-15 driver and mounting screw. Additional inserts are available (P/N 7622).
The 1/4" drill chuck available for this vertical mill is supplied complete with a Morse No. 1 arbor and a drawbolt to hold it securely in place. Drilling can be accomplished by raising and lowering the entire head with the vertical feed handwheel. This allows for very accurate control of feed rate and hole depth. For accurately located holes we again stress the importance of using center drills.
Drills should be kept in excellent condition, either by replacement or proper resharpening. Good quality high speed steel drills should be employed. A dull or improperly sharpened drill can cut oversize by as much as 10%. When you start to drill, the initial penetration should be no more than twice the diameter of the hole before you retract the drill, clear the chips and add coolant with the tip of a small brush. From then on, do not try to drill deeper than the diameter of the drill without clearing the chips and adding coolant. For example:
|
OPERATION |
TOTAL |
|
1st Pass: 2 times diameter or 1/4" |
1/4" |
|
2nd Pass: 1 times diameter or 1/8" |
3/8" |
|
3rd Pass: 1 times diameter or 1/8" |
1/2" |
|
Etc. |
Etc. |
You may encounter recommendations exceeding these figures, but they are meant for automatic equipment with pressurized coolant systems.
It is difficult to maintain tolerances of better than +.003"-.000" with a drill. If tolerances closer than these are required, a reamer must be employed. Try to use fractional size reamers whenever possible rather than decimal sizes, because the cost difference can amount to 2 or 3 times higher. (The length of reamers may prevent their use for some operations on machines of this size.)

FIGURE 18-Typical Center Drill
To accurately start holes, center drills must be used. They have a small tip which accurately starts the hole, and then the shaft widens with a 60° cutting face to the final diameter. Care must be taken to employ cutting oil and to clear the drill frequently. If this is not done, the fragile tip may load up and twist off even in soft materials. Center drills are available in a variety of sizes, but for general work we recommend No.1.
|
SIZE |
BODY |
DRILL |
DRILL |
LENGTH |
|
000 |
1/8" |
.020" |
3/64" |
1-1-4"</TD |
|
00 |
1/8 |
.025 |
1/16 |
1-1/4 |
|
0 |
1/8 |
.031 |
1/16 |
1-1/4 |
|
1 |
3/16 |
.046 |
3/64 |
1-1/4 |
|
2 |
3/16 |
.078 |
5/64 |
1-7/8 |
|
3 |
1/4 |
.109 |
7/64 |
2 |
FIGURE 19-Table of commonly available center drill sizes
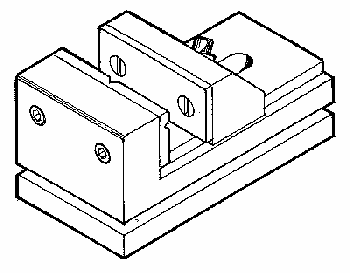
FIGURE 20-The SHERLINE Mill vise
The vise shown here and in figures 42 and 44 is furnished with special clamps that allow it to be clamped in any position on the mill table. The vise capacity is 2 inches. It has a movable jaw which is pulled down while clamping, eliminating any chance for the jaw to lift. It is the most convenient way to hold small parts for milling.
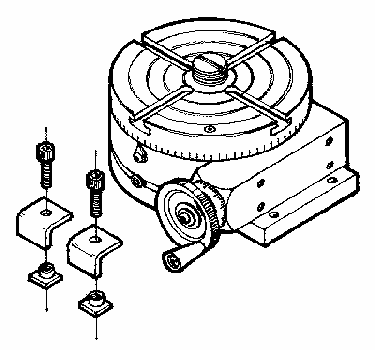
FIGURE 21-SHERLINE's 4" Rotary Table
The rotary table mounts to the mill table and provides a rotary axis for milling. Each increment on the handwheel represents 1/10° of rotation, so a circle can be divided into 3600 segments without interpolation. 72 handwheel revolutions rotate the table one time. It can be used to mill a radius on a part, cut a circular slot or drill precision circular hole patterns. Used with the right angle attachment (P/N 3701) and right angle tailstock (P/N 3702) it can also be used to cut gear teeth. A rotary table used with a mill allows a machinist to produce virtually any part he can design. The only limits are size, not complexity. The compact size of this high quality rotary table also make it a good choice for use on larger machines where its size would offer an advantage in working with small parts.
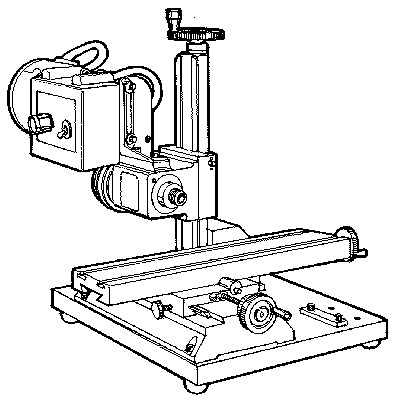
FIGURE 22-The Horizontal Milling Conversion turns the standard SHERLINE vertical mill into a horizontal mill. This greatly expands the operations that can be completed on the mill.
A number of milling operations require the application of the cutting tool from the side rather than from the top. A 3/4" thick aluminum base 10.5" x 12.5" allows the mill column to be mounted separately from the base for a variety of milling configurations. The headstock is rotated 90° and work is machined from the side, allowing larger surfaces to be worked on without having to reclamp the work.
The black anodized mounting plate is predrilled to mount the base and column in several possible locations. Alignment bars and a selection of appropriate bolts are included to make it easy to accurately relocate the column. Rubber feet insulate the table for quiet, vibration free operation. (Note: the column base should be shortened by 2" for best operation. Instructions are provided or we will shorten your column for you. The modification is listed as P/N 6101.)
Your mill can be made more versatile with the addition of suitable attachments and accessories. These include various chucks and collets, a thread cutting attachment, vertical milling column, knurling tool, a live center and many others. Remember that accessories and attachments must be cared for in the same way as the lathe. Always make sure that threads are free from metal chips and dirt. Chucks should be lightly oiled frequently so that they continue to function smoothly and accurately. Gears in the thread cutting attachment should be lightly greased when in operation. Some attachments have moving slides and these should be lubricated in the same way as the slides in your lathe. Each accessory comes with complete instructions for its use when it is purchased.
KEY TO MATERIALS: A=Aluminum, B=Brass, C=Composite, DC=Die Cast, P=Plastic, U=Urethane, S=Steel
|
PART NO. |
DESCRIPTION |
MATERIAL |
|
12970 |
Headstock
Spacer Block (Deluxe Mill) |
A/S |
|
30220 |
Toggle
Switch Retaining Ring |
S |
|
30230 |
Toggle
Switch |
-- |
|
31080 |
10-32 x
3/8" Flat Pt. Set Screw |
S |
|
34000
(34100) |
Oversize
Handwheel, Inch (Metric) |
A |
|
34060 |
Thrust
Bearing Washer Set |
Ball |
|
34200
(34300) |
2"
Zero Adjust. Hndwhl. Asby., Inch
(Metric) |
A/S |
|
34210 |
2"
handwheel Body |
A |
|
34220 |
Handwheel
ocking Nut |
S |
|
34230
(34240) |
Y Axis/Crosslide
Collar, Inch (Metric) |
A |
|
34250 |
6-32 x
7/8" Pan Hd. Screw |
S |
|
34260
(34270) |
X, Z Axis
and Leadscrew Collar, Inch
(Metric) |
A |
|
34400
(34500) |
2-1/2"
Zero Adjust. Hndwhl. Asby., Inch
(Metric) |
A/S |
|
34410 |
2-1/2"
Handwheel Body |
A |
|
40010 |
15"
Lathe Bed |
DC |
|
40020 |
Motor
Bracket |
Diecast |
|
40040 |
Drive
Belt |
Urethane |
|
40050
(41050) |
1-5/8"
Handwheel, Y Axis/Crosslide, Inch
(Metric) |
A |
|
40070 |
Faceplate |
Diecast |
|
40080
(41040) |
1-5/8"
Handwheel, X Axis/Leadscrew, Inch
(Metric) |
A |
|
40090 |
Drive Dog |
Diecast |
|
40100 |
Headstock
Casing |
A |
|
40120 |
15"
Lathe Bed |
S |
|
40160 |
Preload
Nut |
S |
|
40170
(41170) |
Saddle
Nut, Inch (Metric) |
B |
|
40180 |
Tool Post |
A |
|
40200
(41200) |
Leadscrew,
Inch (Metric) |
S |
|
40220
(41220) |
Feed
Screw, Inch (Metric) |
S |
|
40230 |
Headstock
Spindle |
S |
|
40240 |
Headstock
Pivot Pin, Lathe |
S |
|
40250 |
Tool Post
Tee Nut |
S |
|
40260 |
Head Key |
S |
|
40270
(41270) |
Tailstock
Spindle, Inch (Metric) |
S |
|
40280 |
Thrust
Collar |
S |
|
40300 |
Leadscrew
Thrust |
S |
|
40320 |
Bearing
Washer |
S |
|
40330 |
10-32 x
5/8" Skt. Hd. Cap Screw |
S |
|
40340 |
110-32 x
1" Skt. Hd. Cap Screw |
S |
|
40370 |
Leadscrew
Support |
S |
|
40380 |
#1 Morse
Center |
S |
|
40390 |
#0 Morse
Center |
S |
|
40400 |
Plug
Button |
P |
|
40420 |
Headstock
Bearing |
Ball |
|
40440 |
Self
Tapping Screw |
S |
|
40500 |
10-24 x
7/8" Skt. hd. Cap Screw |
S |
|
40510 |
10-32 x
3/8" Skt. Hd. Cap Screw |
S |
|
40520 |
10-32 x
3/16" Cup Pt. Set Screw |
S |
|
40530 |
5-40 x
3/8" Skt. Hd. Cap Screw |
S |
|
40540 |
5/16-18 x
3/4" Cone Pt. Set Screw |
S |
|
40550 |
5/32"
Hex Key |
S |
|
40560 |
3/16"
Hex Key |
S |
|
40570 |
3/32"
Hex Key |
S |
|
40580 |
Spindle
Bar |
S |
|
40590 |
1/4"
I.D. Washer |
S |
|
40600 |
10-32 x
1/4" Flat Pt. Set Screw |
S |
|
40620 |
Power
Cord, USA |
-- |
|
40630 |
Power
Cord, UK |
-- |
|
40640 |
Power
Cord, Europe |
-- |
|
40660 |
3/16"
I.D. Washer |
S |
|
40670 |
10-32 x
1/2" Skt. Hd. Cap Screw |
S |
|
40690 |
10-32 x
3/4" Skt. Hd. Cap Scrw |
S |
|
40760 |
10-32 x
5/8" Thumbscrew |
S |
|
40820 |
Gib Lock |
S |
|
40860 |
Tailstock
Locking Screw Grommet |
P |
|
40870 |
Tailstock
Spindle Locking Screw |
S |
|
40890
(41890) |
Slide
Screw Insert, Inch (Metric) |
B |
|
40900 |
10-32 x
3/8" Flat Hd. Skt. Screw |
S |
|
40910 |
Saddle |
A |
|
40980 |
Crosslide
Gib |
Composite |
|
40990 |
Saddle
Gib |
Composite |
|
41080 |
6-32 Hex
Nut |
S |
|
41110 |
Tailstock
Casing |
A |
|
41130 |
DC Speed
Control Knob and Set Screw |
P/S |
|
43100 |
DC Motor
Standoff |
A |
|
43110 |
DC Speed
Control Case |
P |
|
43120 |
DC Speed
Control Hinge Plate |
P |
|
43130 |
DC Speed
Control Cover Mounting Plate |
P |
|
43140 |
DC Speed
Control Tab, Small |
P |
|
43150 |
DC Speed
Control Tab, Large |
P |
|
43160 |
Belt
Guard, Outer |
P |
|
43170 |
6-32 x
1-3/8" Pan Hd. Screw |
S |
|
43180 |
Belt
Guard, Inner |
P |
|
43190 |
#2 x
1/4" Flat Hd. Sheet Metal
Screw |
S |
|
43200 |
DC Speed
Control Foil Label |
Foil |
|
43230 |
Stepped
Main Spindle Pulley |
A |
|
43360 |
Stepped
Motor Pulley |
A |
|
43460 |
DC Speed
Control Electronics |
-- |
|
44010 |
24"
Lathe Base |
DC |
|
44120 |
24"
Lathe Bed |
S |
|
44200
(44230) |
24"
Leadscrew, Inch (Metric) |
S |
|
44210
(44220) |
Slide
Screw, Inch (Metric) |
S |
|
44880 |
Crosslide |
A |
|
45010
(45160) |
Leadscrew,
Z Axis, Inch (Metric) |
S |
|
45030 |
Column
Bed |
S |
|
45040 |
Saddle, Z
Axis |
A |
|
45070 |
Lock,
Teflon |
P |
|
45170 |
Column
Saddle Lock |
P |
|
45180 |
3/16"
Ball Bearing |
S |
|
45190 |
#10 Type
B Washer |
S |
|
45200 |
Leadscrew
Thrust, Bored |
S |
|
45450 |
DC Motor
with externally replaceable
brushes |
-- |
|
50010 |
10"
Mill Base |
A |
|
50050 |
Column
Base |
A |
|
50120 |
Backlash
Lock |
S |
|
50130
(51130) |
Backlash
Nut, X Axis, Inch (Metric) |
S |
|
50140
(51140) |
Backlash
Nut, Y Axis, Inch (Metric) |
S |
|
50160
(51160) |
Leadscrew,
Y Axis, Inch (Metric) |
S |
|
50170
(51170) |
Leadscrew,
X Axis, Inch (Metric) |
S |
|
50180 |
Mill
Table |
A |
|
50190 |
X Axis
Lock |
S |
|
50200
(51200) |
Nut, Y
Axis, Inch (Metric) |
B |
|
50210 |
8-32 x
1/4" Pan Hd. Screw |
S |
|
50220 |
1/4-20 x
1-3/4" Skt. Hd. Cap Screw |
S |
|
50240 |
Headstock
Pivot Pin, Mill |
S |
|
50280 |
Thrust
Collar, Mill |
S |
|
50910 |
Saddle |
A |
|
50980 |
Gib, X
Axis |
C |
|
50990 |
Gib, Y
Axis |
C |
|
54020
(54120) |
12"
Mill Base, Deluxe Engraved, Inch
(Metric) |
A |
|
54160
(54170) |
Leadscrew,
Y Axis, Deluxe Mill, Inch (Metric) |
S |
|
54180
(54190) |
Mill
Table, Deluxe Engraved, Inch
(Metric) |
A |
|
90060 |
DC Speed
Control 5K Potentiometer |
-- |
|
90080 |
3/8-32
Hex Nut |
S |
RETURN TO ACCESSORIES MASTER LIST
Shop for Sherline LATHES
Shop for Sherline MILLING MACHINES
RETURN TO My Home Page
| Home
Page | Frequently
Asked Questions | Testimonials
| Lathes
|
| Mills
| Accessories
|
Tool
Prices | Accessory
Prices |